Work-Order Print Prefs.
In this, you can select the settings of different data that you want to print on the work order form.
Go to Setup then Preferences and now click on Work-Order Print Prefs.
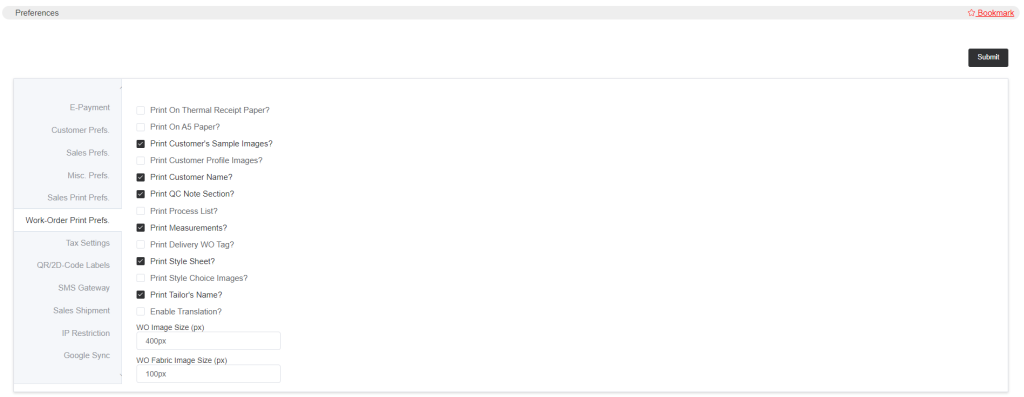
Print On Thermal Receipt Paper is if you choose to select this then the work-order sheet will get printed on thermal receipt paper.
In the same way, you can choose to print a work-order sheet on A5 paper by enabling Print On A5 Paper.
Print Customer’s Sample Images are the images that get uploaded while creating the work order. While creating the work order, in the work order form there is an option called Images there you can upload any images related to the customer or work order and those images will get printed.
Similarly, Print Customer Profile Images while registering a customer’s profile you will see a field called Body Profile Images, there you can upload the customer’s profile images; such as front profile, side profile, back profile, etc. So if you select this option, those images will get printed on the work order sheet.
Enabling Print Customer’s Name will print the customer’s name in the work order sheet.
‘Print QC Note Section’ If this is selected, a blank ‘comment or note’ section will be printed on the work order sheet, and there the quality check-related points can be added by the supervisor, quality check manager, or master.
‘Print Process List’ is by enabling this, you can print production process instructions.
- You can check how to add a process instruction by going to Setup->Tailoring Setup->Production Stages. Add/Edit a Production Process, then you will find a field Printable QC Points. You can refer to the below image.
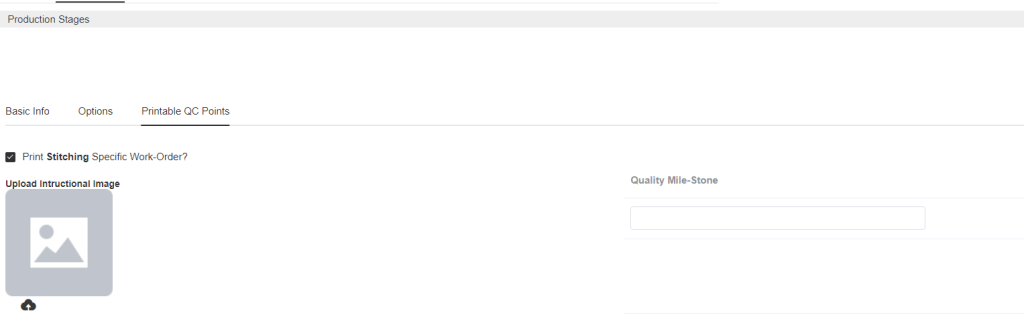
Select the option Print Specific Work-Order, you will now find options to upload Instructional Images and quality milestones. You can add multiple quality milestones for the production processes. These instructions will be printed on the work order sheet.
Print Measurements so if you enable this measurement values will get printed on the work order sheet. Also, if you do not want measurements on the work order sheet then you can print measurements from customers profile as well.
Print Delivery WO Tag is you can print the delivery tags by selecting this option. And the tags can be set by you. To set the tags go to Setup->Preferences->QR/2D Code Labels.
The Print Style Sheet, this option can be enabled if you want to print the style choices on the work order sheet.
- To add the style choices you need to go to Setup->Tailoring Setup->Sales Templates, add/edit a product then you will find the Style Choices option. Now you may create the style choices. So as a result, while creating work orders, those style choices will be displayed and you will need to select which style you want for that item.
The Print Style Choice Images, if you select this option, the style choices images you will upload in the Style Choices field in the Sales Templates, will be printed on the work-order sheet.
By selecting Print Tailor’s Name, the tailor’s name will get printed on the work order sheet. In the work order form while creating work order, a column will appear and there you can select the tailor/worker name and that will be printed.
Enable Translation, is for measurements and style choices. If this is enabled, you can set the measurement and style names in your local language so that the tailors can understand it properly. And that translation will get printed on the work order sheet.
- To add measurement translations go to Setup->Tailoring Setup->Master Measurement Sheet.
To add translations for styles go to Setup->Tailoring Setup->Sales Template, edit/add template and then go to style options.
There you will see a translation column and now add the translation and submit. You can refer to the below image to know how it appears for measurements. You can also check how it works for the styles.
To set the appropriate size of the WO image and WO fabric image on the work order print, add the image sizes in the given field.
Submit it after making any changes.