Orders
Here this window allows you to make the sales orders with all appropriate details. You can search for a customer by his/her name (only if the customer’s profile was registered by you previously). If not then you can register the customer by creating their profile.
Go to Sales then Orders and then Orders
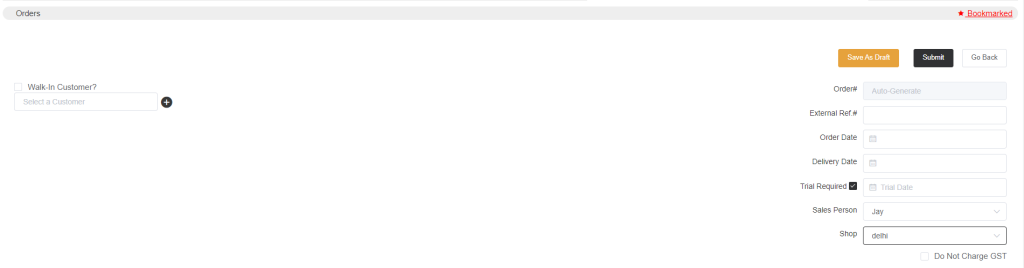
In the above picture, you can see the search box where you can search for a customer to place their order. If the customer is a walk-in customer and you don’t want to add that customer to your customer list, select the Walk-In Customer option. You may also disable the option from preferences.
To register a new customer’s profile, click the plus sign alongside the search box. You will be asked for all the basic details of the customer. Fill in all the details and submit. A new customer profile will be created.
The Order number will be system-generated. In place of the external Inv. ref. number, you can add the number you maintain in a diary or written format. You can select the order date and delivery date. Also, the delivery date will be auto-selected as per the delivery buffer date (if you have set any delivery buffer date), otherwise, you can select the delivery date manually.
Select if a trial is required or not and select the trial date. Select the salesperson’s name and shop.
Do not charge GST, so here, as per India’s tax, GST is added. For different countries, respective taxes can be added. Select this option if you will not charge any tax for any particular order.
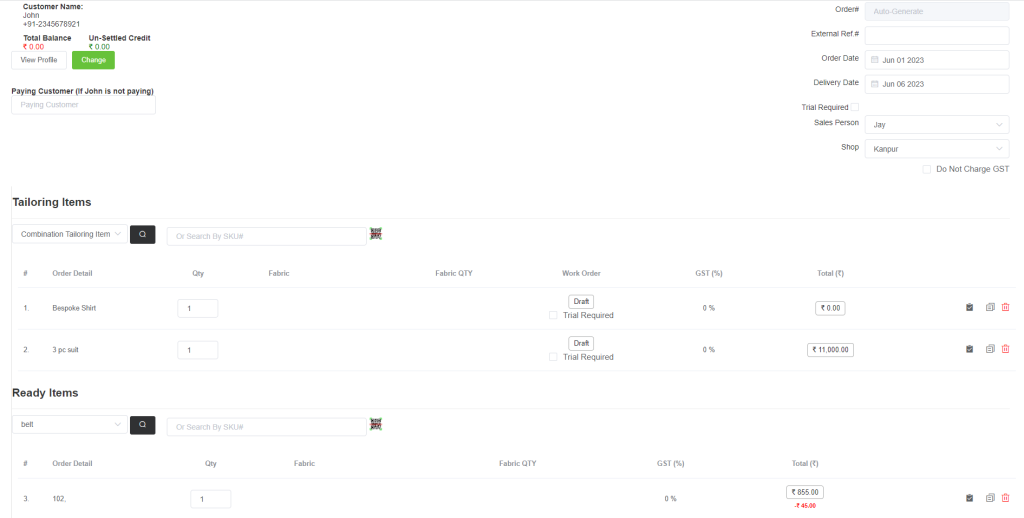
- Click on View Profile. Here you will see the basic information of the customer and also you will be able to record the body measurement of the customer. So that in the future again if the customer places any other order, you will not need to take the measurements for the second time. The old measurements will get copied. If someone other is paying on behalf of the customer then you can mention their name in the Paying Customer column.
- You can search items by categories or SKUs. You can separately add tailoring and ready items to the order. To make a separate list, go to setup->preferences->sales prefs. and select the option Display Tailoring And Ready Item In Different List.
- While adding items you will be asked to choose the fabric, so if the customers bring their fabric, then you do not need to add/select fabric, you can skip the fabric-choosing process. To have a skip option, go to setup->tailoring setup->tailoring product then edit an item and go to the price and tax section of that item and select the option Is Fabric Optional.
- If you choose fabric, you will see the Fabric QTY column, you will need to add the fabric QTY.
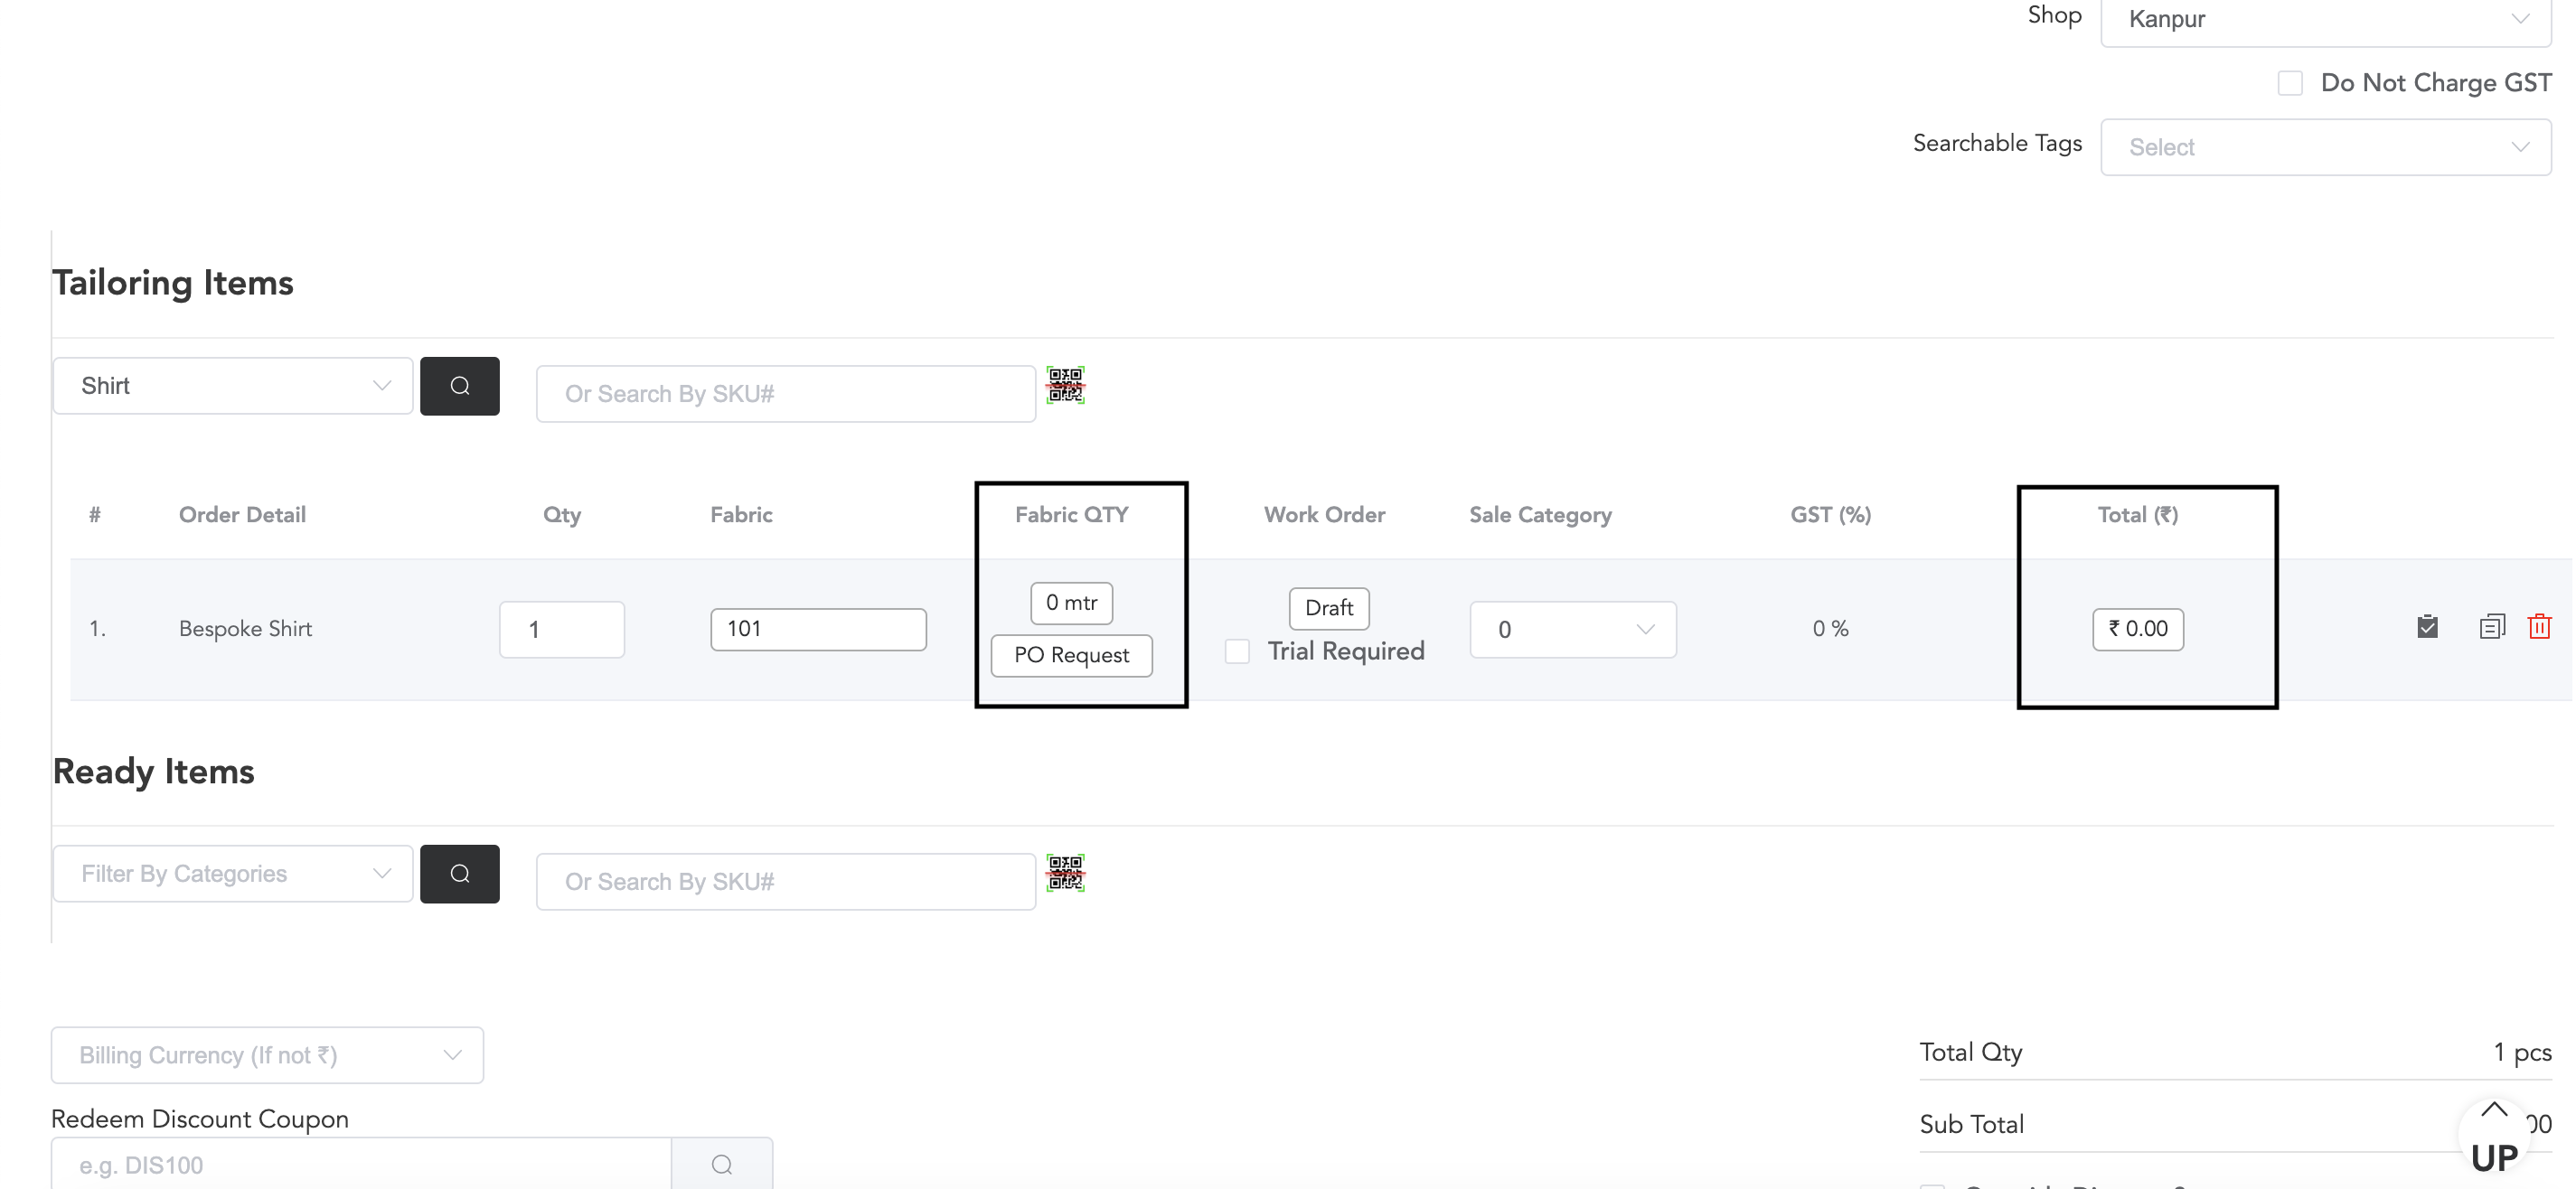
Then while adding the price of the fabric in the total column, you need to add the per unit price and the system will calculate the total cost as per the quantity of the fabric.
After adding the items to the list you can add the product quantity, create the work orders, and edit price details.
- To create the work orders for tailoring items, in the above image you can see the Draft option in the Work Order column, click on the Draft, and another Create option will appear. Now click on the Create option and create the work order by entering all the work order details. Then you will see the work order status as Open. The work order is now created. You can now go to Production -.> All Work Orders to assign the work orders to workers.
Schedule Trial For Individual Items
- So one more thing here is if you want to schedule all the trials, then before creating the work order, select the option Trial Required which is in the work order column. And after creating the work order you will see the option to schedule trials.

If you click the Schedule Trials option, it will let you enter the trial dates.
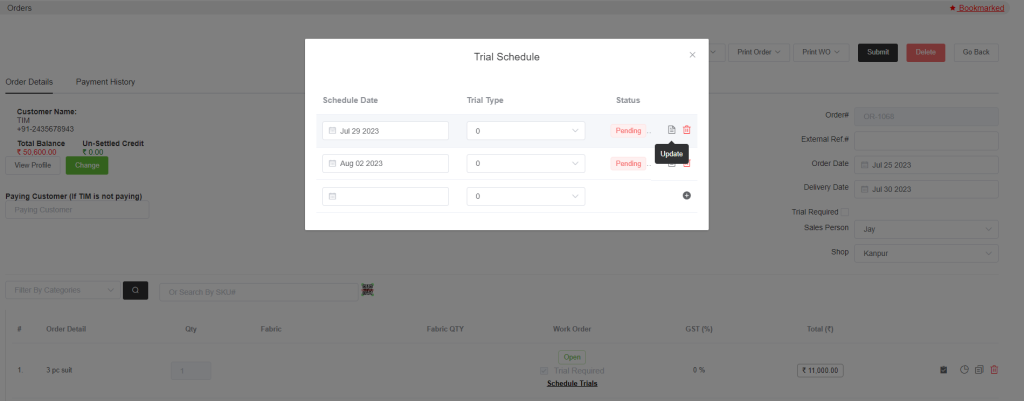
Enter the trial first trial date, and trial types, (again the trial types can be created in setup->tailoring setup->trial types) and press the update icon to save the trial dates. Once a trial is finished it will show the status as completed. You can add multiple trial dates by clicking the plus sign.
Then in the total amount column you can edit the price and discount also. Click on the Total amount and a Price Break-Up Pop-up will appear.
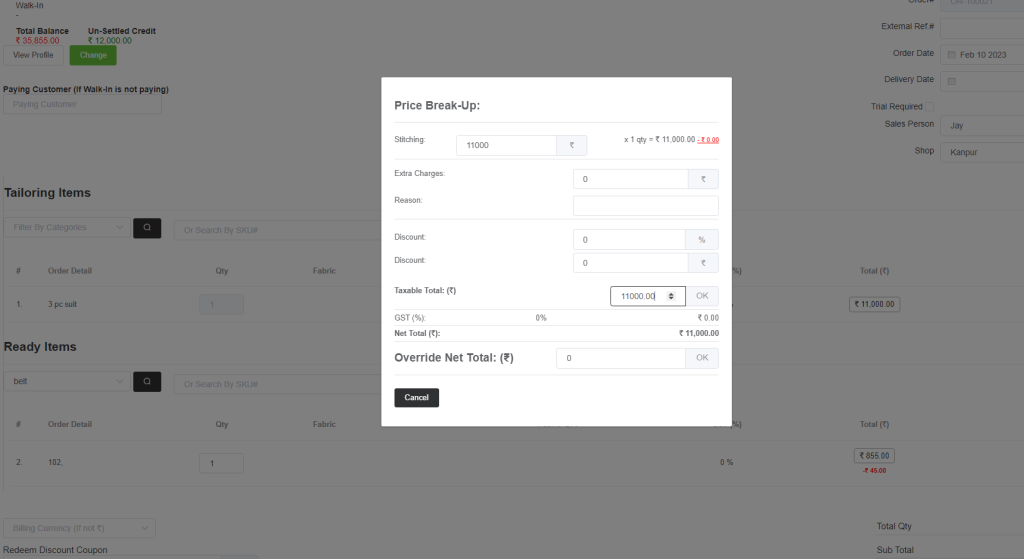
You can set the discount and extra charges and press enter to apply the changes.
Also, you can add the overall discounts and other additional charges.
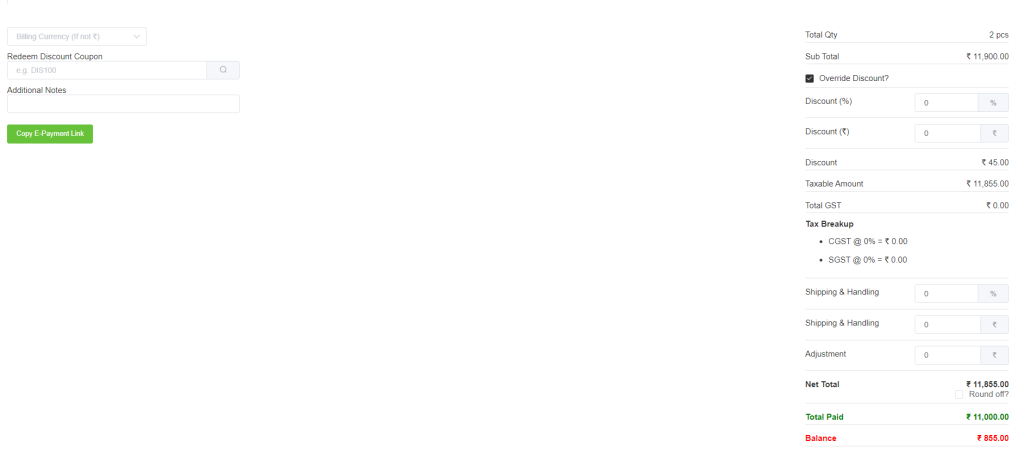
Select the Override Discount option and the discount column will appear. If not in the item level then you can add the overall discount here for all items. And if you do not use the discount field, you can add the discounted amount in the Adjustment field by adding a minus(-) to the amount. You may add transportation charges in the shipping & handling column.
In the Billing Currency column, you can select the currency that will be used for billing. You can set if the customer can redeem any coupon. To create the coupon codes, go to setup->sales setup->discount coupons. If you have enabled the E-Payment, then you can copy the payment link, paste it anywhere and send it to your customers.
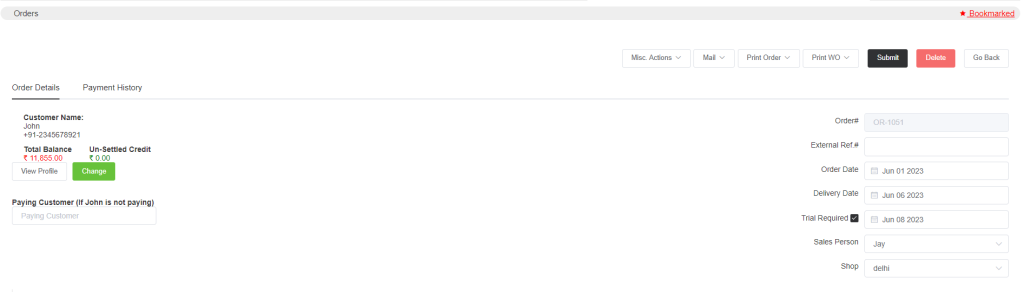
- After submitting the order a Payment History option window will appear, where you can record the customer’s payment.
Go to Payment History and then Record New Receipt

Select the date, and enter the amount that the customer wants to pay. It may be the full payment or partial. Enter the adjustment amount, select the payment mode and any additional notes. Now submit and the receipt is now created.
- Also, after submitting the order you will see options like Misc. Actions, Mail, Print Order, Print WO. Note that these options will not appear if the order is in draft mode.
So in Misc. Actions you can see the production history of the order.
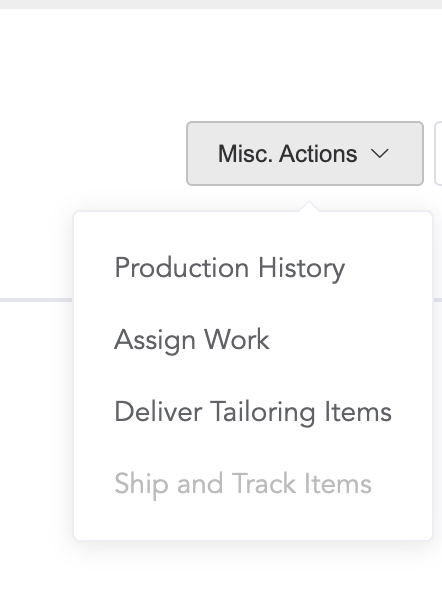
By clicking on Assign Work, if the work order is created then you can assign works to the workers (there is also another way that is from production->all work orders).
and from here you can create delivery receipts for ready-for-delivery items, by clicking Deliver tailoring and Retail Items.
- From Notify, you can send the order details to the customers in PDF format via WhatsApp and email or text message.
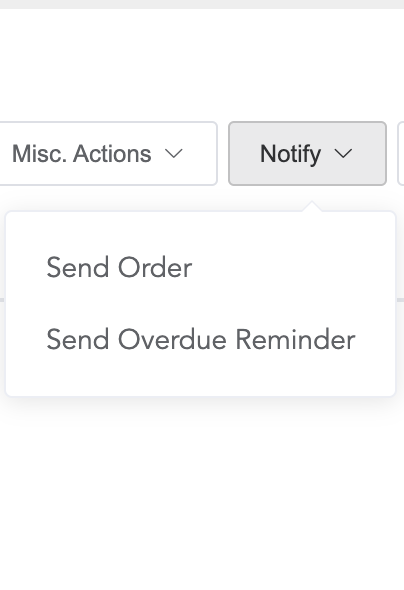
You can also send an order overdue reminder to the customer by clicking Send Overdue Reminder. Before you send both of the above, make sure that WhatsApp is integrated, or if you want to send SMS then you should have SMS credits and create communication templates from Setup->Communication Templates.
- From Print Order
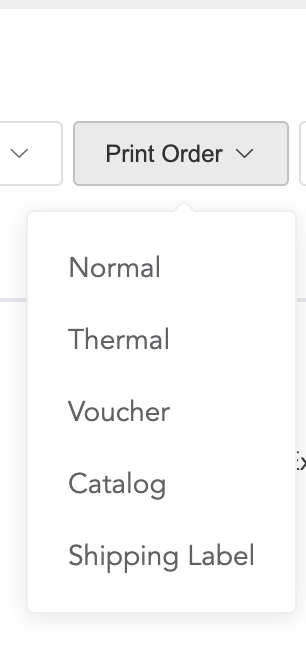
You can print the order on normal paper, or thermal paper or an order voucher can also be printed. Order catalogues can be printed and if you have recorded the customer address in their profile then you can print the shipping labels too.
- and Print WO, you can take the printout copy of order details and work order details.
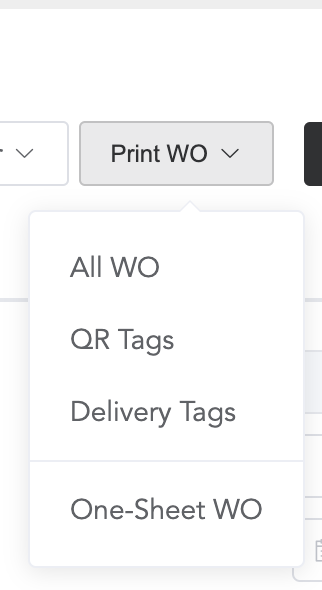
Click on All WO to print all the work orders, QR Tags and Delivery Tags can also be printed (different QR tags can be created in setup->preferences->QR/2D labels).
One-sheet WO print is for those who deal with a particular item. They can print the work order in a single sheet.