Employees/Contractors
In this section, you can add information about your employees and contractors. All their basic, official, and production work information can be recorded. The employees’ pictures can also be uploaded and employee IDs can be generated.
Go to Setup then HR Setup and then Employees/Contractors
- Basic Information
You can store all the basic information of your employees/workers.
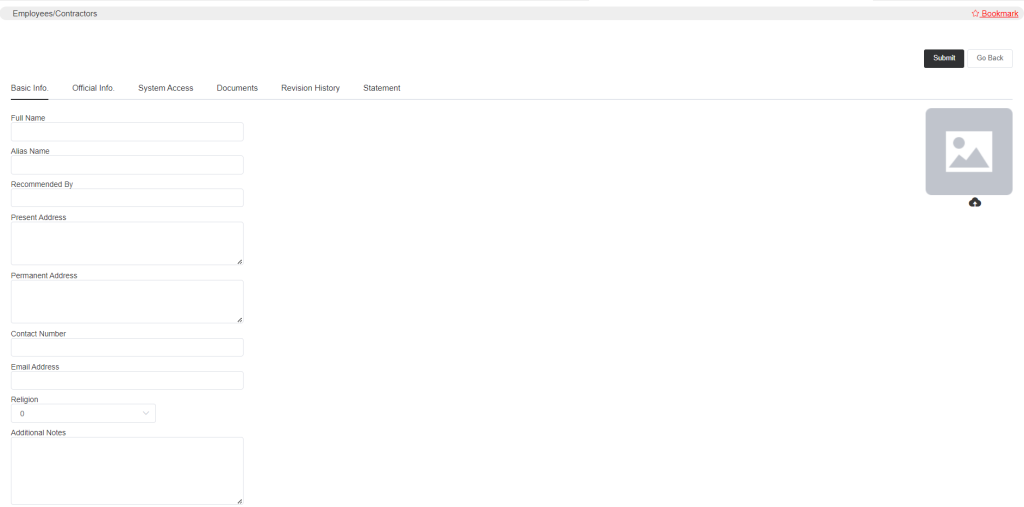
In the Full Name column, enter the full name of the employee. In Alias Name enter the short name or nickname of the employee. You can go ahead and enter who recommended the employee. Add the present and permanent address of the employee. Enter the contact number and email ID of the employees. Select the religion and you may add any additional notes about the employee.
- Official Information
The official information about the members of your team should also be kept. All the official details can be stored in the system.
- The Revise Official Information option is if you want to edit or add any information then you will be asked the reason.
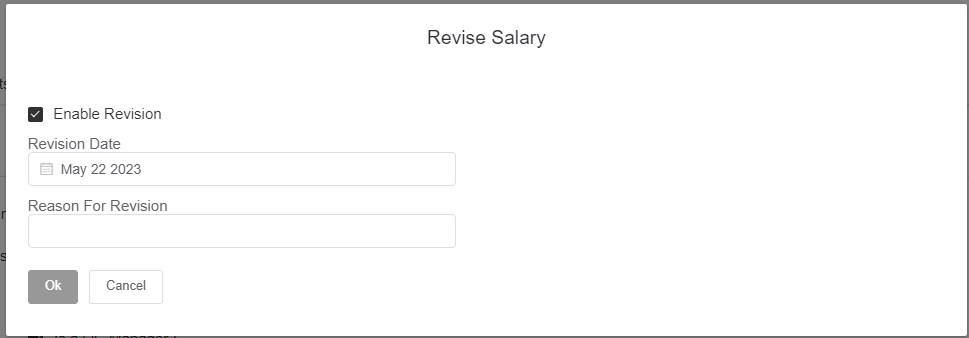
Select the option Enable Revision.
Enter the Revision Date which is on which date you are editing or adding any official information. Now state the reason for editing then click the ok button, now you will be able to edit or add any new information. This way you will track the revision history and reasons behind the revision.
- In the Basic Info., select if the employee Is Active or not if he/she is a Regular Employee or not and if the employee is a Contractor.
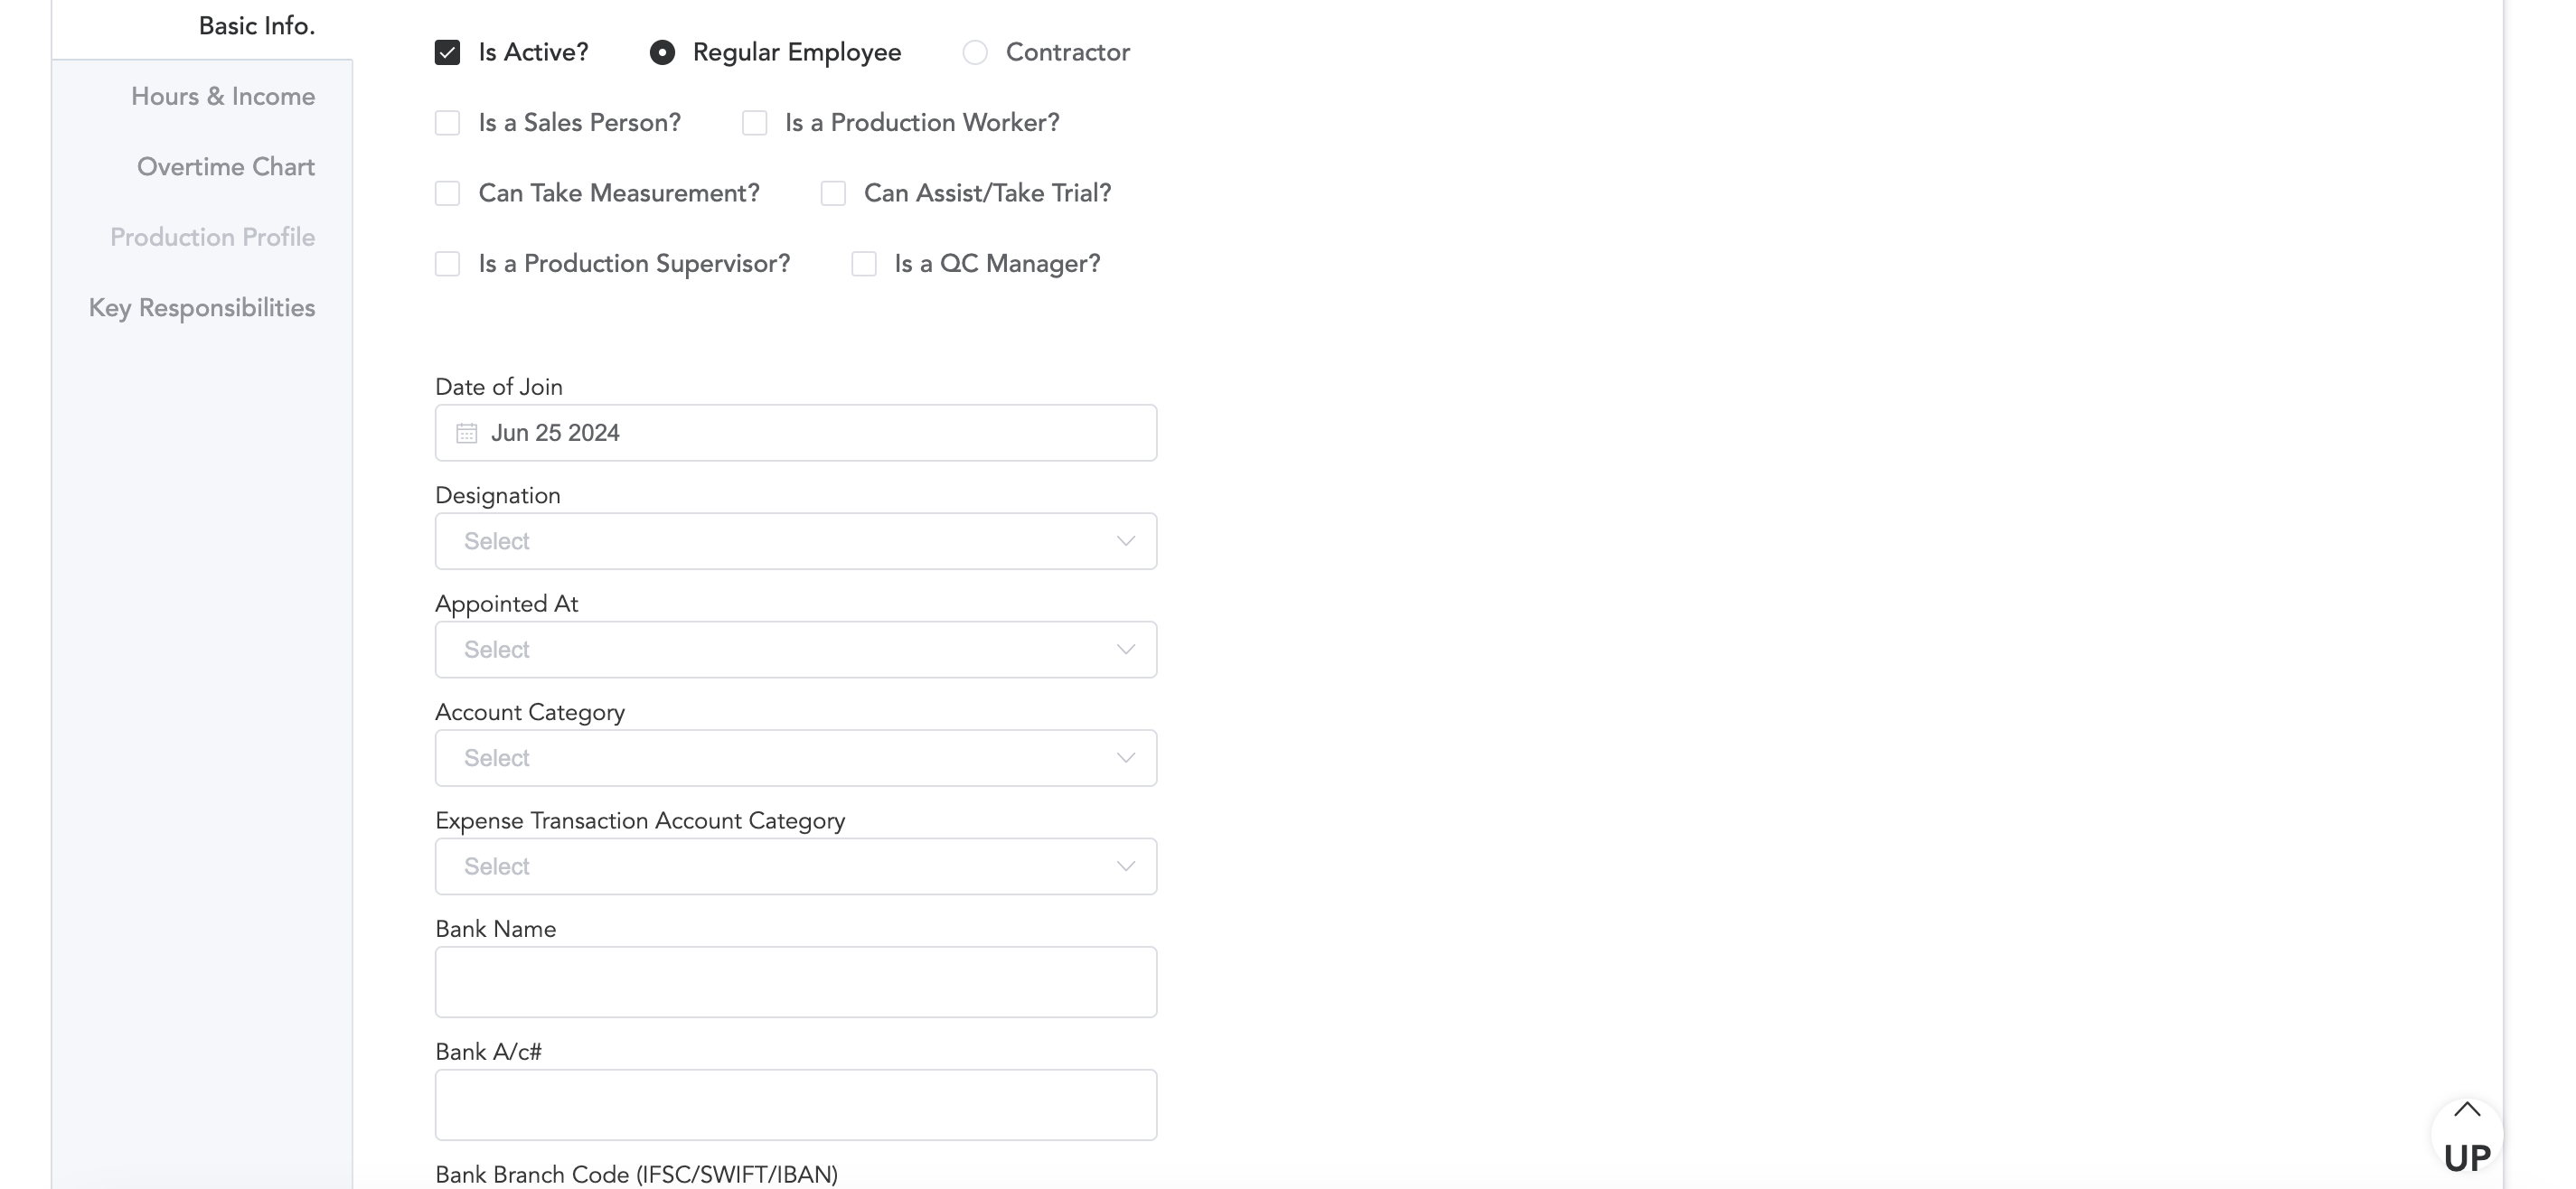
Select if he/she is a Sales Person or a Production Worker. And if they Can Take Measurements of the customers or if they ‘Can Assist/take Trial‘. Select if the employee Is a Production Supervisor or a QC Manager who will check the quality of the products.
Select the Date of Joining and Designation category as defined before. And most importantly you should not skip the field Appointed At. Select the location where the employee is appointed.
You may select the Expense Transaction Account Category (but it’s optional). You need to create the expense categories, in the setup->Accounts Setup->Account Categories. If you select the category, it will help you in accounting. You can obtain the account reports if you import data from ETA to Tally.
Enter the Bank Name, Bank Account Number and Bank Branch Code of the employee.
- Hours & Income section defines the working hour and the payment of the workers.
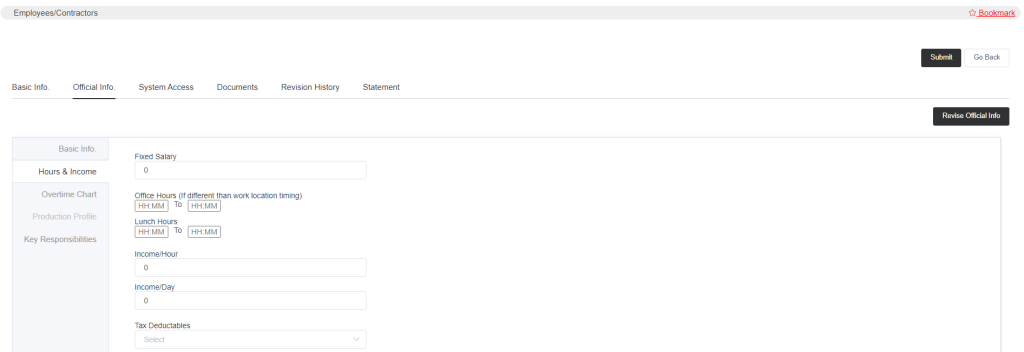
Enter the Fixed Salary of the employee. Define the office hours if it is different from the shop’s opening and closing hours. Define the lunch hours (if any). Enter the per-hour and per-day income. Select the tax percentage that will be applied to the income of the employees.
- ‘Overtime Chart’ defines the overtime that the employees have done.
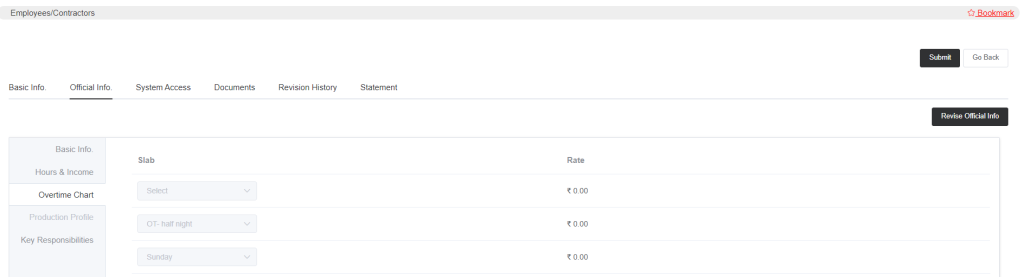
The overtime names you can define in the Overtime Slabs section in HR Setup. Here you will only need to select them.
- Production Profile lets you manage the work details of the workers. You can manage the production processes and piece rates of the workers.
To enable the production profile of the employee, you need to select the option Is a Production Worker, which is in Basic Info.
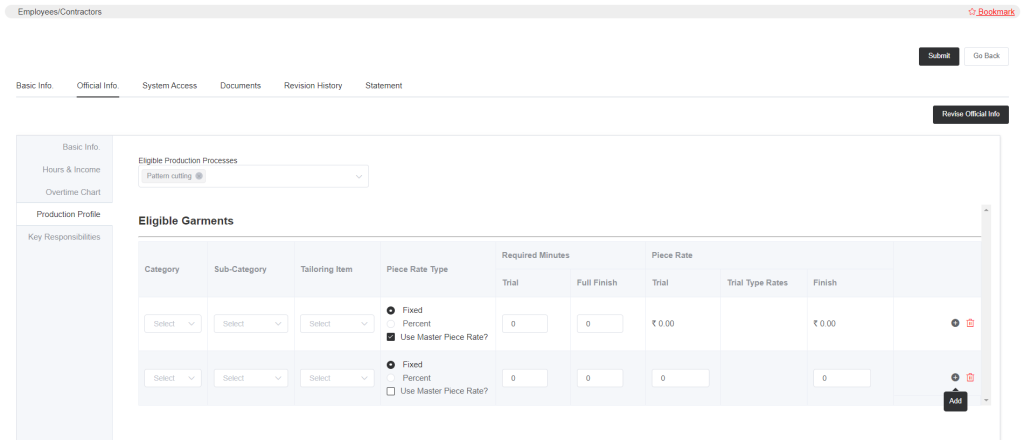
Select the production processes that the employee/worker is going to work on. For instance if you are registering the worker who does the cutting process then in his/her production profile you need to select cutting in Eligible Production Processes.
Next in Eligible Garments, select the garment category, sub-category and tailoring items in which the worker will do the cutting process. Define the piece rate type if it is fixed or percent.
Here the piece rate can be set individually for each employee/worker and individual items. If you want to set piece rates for all workers, then you can set the rates in category and item level.
While entering the piece rate amount you can select the option Use Master Piece Rate, this way the piece rate that you had defined in the product category level or sales template level will be applied. And if you do not want to use that piece rate then uncheck the option. Then you will see a column where you can add the piece rate amount.
You can set the time limit for each work/process so as a result you will see the next availability date of each worker in the worker status section which is in the production module. In the Required Minutes column, set the time that is required for the trial and full finish process.
And again the piece rate is defined in three types: one is a normal trial, different types of trials and a full finish piece rate. If you do not want to add trial types then you can add the piece rate in the normal trial piece rate column and if you have defined trial types then set the piece rates accordingly. Then add the finishing piece rates for each item.
Define all the garment category according to the eligibility of the worker and submit.
- Key Responsibilities will add specific work instructions to the employees. You can specify what work they can perform according to their job profile.
- System Access
You can select if the employee can use the system or not. You can also set an IP range for the employee so that if he tries to log in outside the location area then the login will be denied.
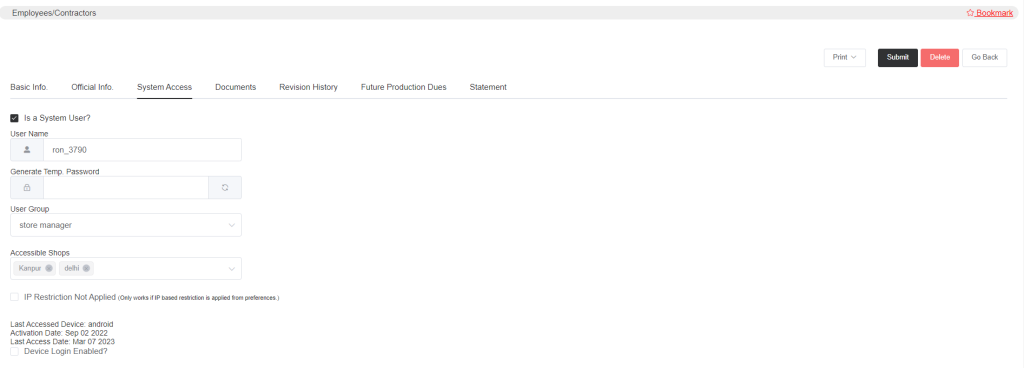
If the employee will use the system then select the option Is a System User. Then the user name of the employee will be generated and to generate the password click on the refresh icon which is in the right side of the password column. Define the user group of the employee and define the stores/shops that the employee has access to.
Select if IP Restriction is Applied or not for the employee. If IP Restriction is enabled in the ‘Preferences’, and if you provide system access to the employees, then you will see the IP Restriction details in the system access tab.
You can have a detail of the employees’ last accessed device, and activation date which means when their ID was activated and when they last accessed the system. Also, you’ll be able to enable the device login.
- Documents
You can upload any documents concerned to the employee.
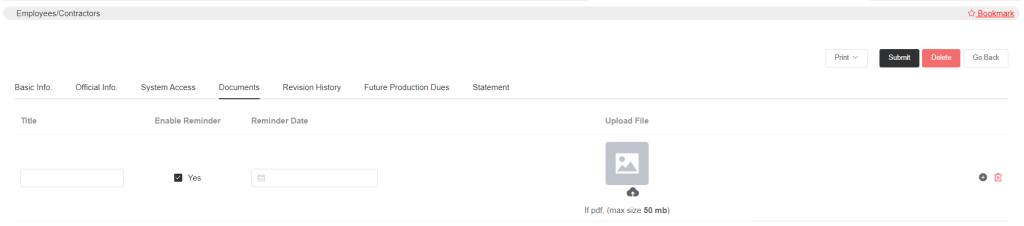
Give the document a title. You can also set a reminder. Click on Enable Reminder. If you enable reminder make sure you enter the reminder date also. And if you want to upload any file or image related to the employee then you can upload it. Similarly, you can add multiple documents one by one.
- Revision History
In the revision history, all the revisions will be recorded with the date, reason and the points that were revised. You can view all the previous revisions here.
- Future Production Dues
Once you start assigning work to the workers, all their due amounts will appear here with the work orders and product details.
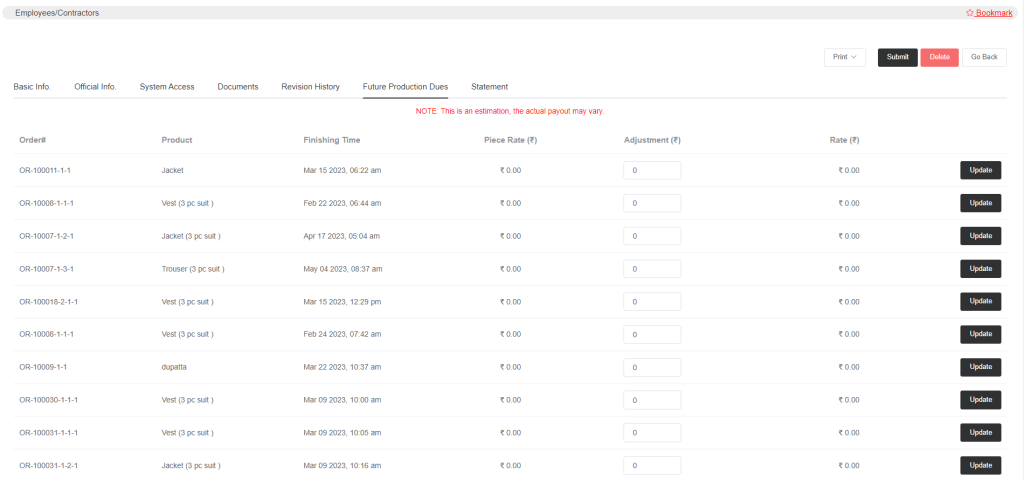
You can see all the due details. If the piece rate is mentioned before then that will appear here and if you want to add any extra amount then you can put the amount in the Adjustment column and then click on Update.
- Statement
In the statement, all the transaction details of the employee will appear such as salary details, loans and advances details, etc.
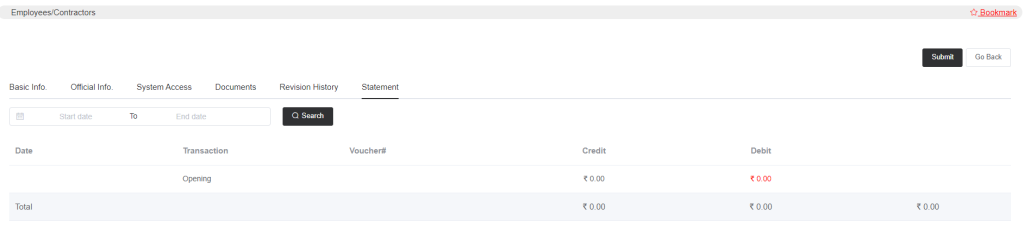
Select the start date and end date, click on Search, and then all the transaction details will appear.
After you register an employee a Print option will appear near the submit option. From there you can print the ID Card of the employee.
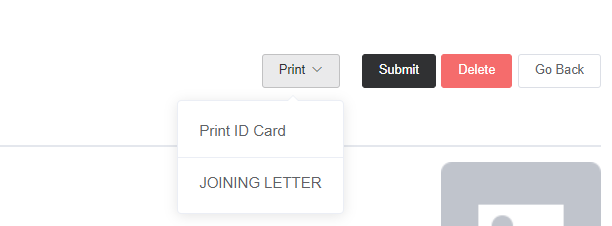
Also, the joining letter or any other letters you created in the letter template section in Setup->HR Setup, can be printed from here for each employee.