E-Store Customization I
https://drive.google.com/file/d/1cF6LO8-yuRYBlx2QpV5BwJddq-iLT4FF/view?usp=drive_link
You can now take your offline store online. You can set up the e-store from your EasyTailorApp account. The ready-to-sell as well as customized garments can be listed, and customers can choose their desired fabric, size, style, etc., for custom garments.
The first setting for the e-store will start from the Shop section of your EasyTailorApp account.
Go to Setup and then Shops. Edit the shop that you want to make an e-store.
Go to Basic Info. and select Establishment Type as E-Store.

Once you select the establishment type as an ‘E-Store,‘ you will see the e-Store Settings tab, where you may add the necessary details.
Firstly, you can add API credentials.

Add the ‘Access Key’ and ‘Secret Key.’

Next, you can upload your brand logo, which will be available on the e-store website.
The domain for the e-store needs to be set here.

Add your domain name to the column.
Shipping partner names and shipping charges can be added

The initial setup for the e-store is now complete. Now, you can move forward to the process of some customizations of the front page of your website and add items in the software to make them available online.
Backend software customisation
To customize the backend, you must add the details of the custom garment and the ready item. After adding the items, you must make them available online on the e-commerce website from the E-Store module of the backend software.
How to add custom garment customisation details
To add custom garments, go to Setup and then Tailoring Setup, click on ‘Actions’ and add a new product, but if any product is already added, you can add additional details by clicking on the edit option so that all those details can be displayed online on the e-commerce website.

Once you add or edit any garment, you will see multiple options, and from there, you can customise the garments for the customers so that they can see those customisation options online and choose their required customisation.

To add various customisations, go to the ‘Customization Options’ and select the option ‘Can Customers Self-Customise This Garment?’. Next, you can add the fabric categories for the item that will be available for online purchase.
The fabric categories can be added in the Setup->Inventory Setup->Fabric Categories.
Now, you can add other customization options with 3D images. Add ‘Base Styles’ name and upload the style image by clicking the cloud icons.
In the ‘Options’, section, more style names that are related to the Base Style can be added.
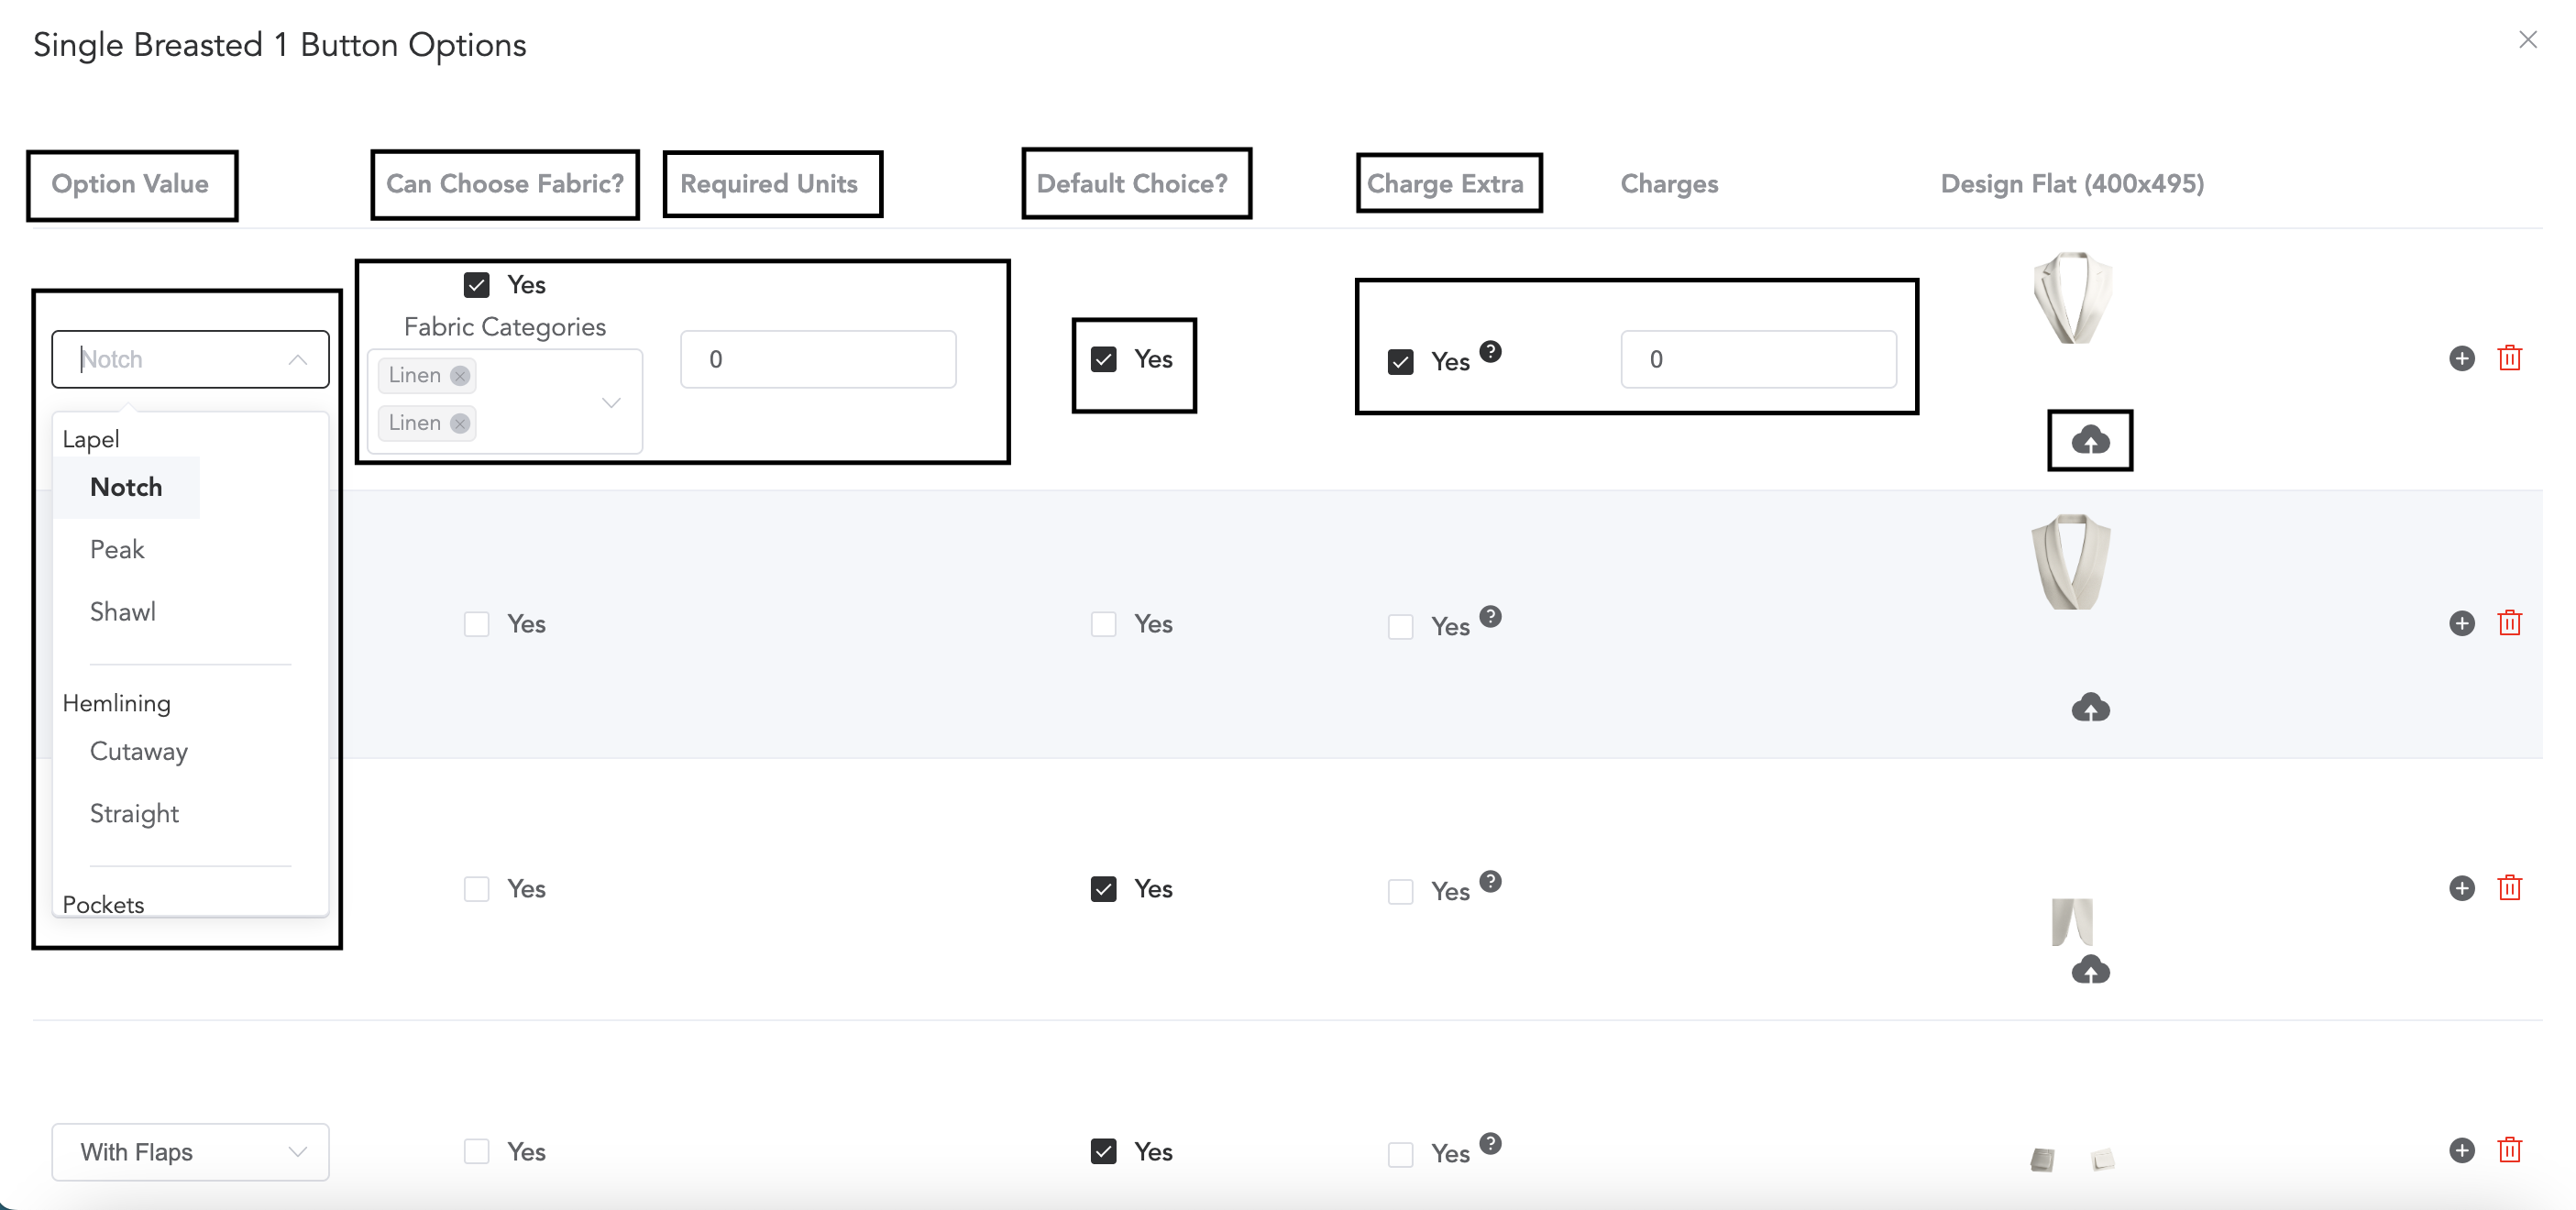
The style names available in the ‘Option value’ can be added in the ‘Style Options’ section in the item profile.

Once the style name is selected, you can select the fabrics that will be available for the style so that while choosing the style, customers can select the fabric for that particular style.
Enable the fabric-choosing option, then select the fabric that you want to display, and you may add the required quantity in the ‘Required Units‘ column.
Any style can be selected as ‘default style choice’; once the style is set as default, that style will be available for all and will be auto-selected.
If you want to charge an extra amount for any style, then you can enable the option and add the amount.
And lastly, the 3D image for the style can be uploaded by clicking the cloud icon.
Multiple Style Options can be added by clicking the plus sign.
How to add ready garment details
All the fabrics and ready garments can be added in the backend, and you can make them available online. The customers can see and add the ready items to the cart.
To add the ready items and fabrics, go to Inventory and then Master Products
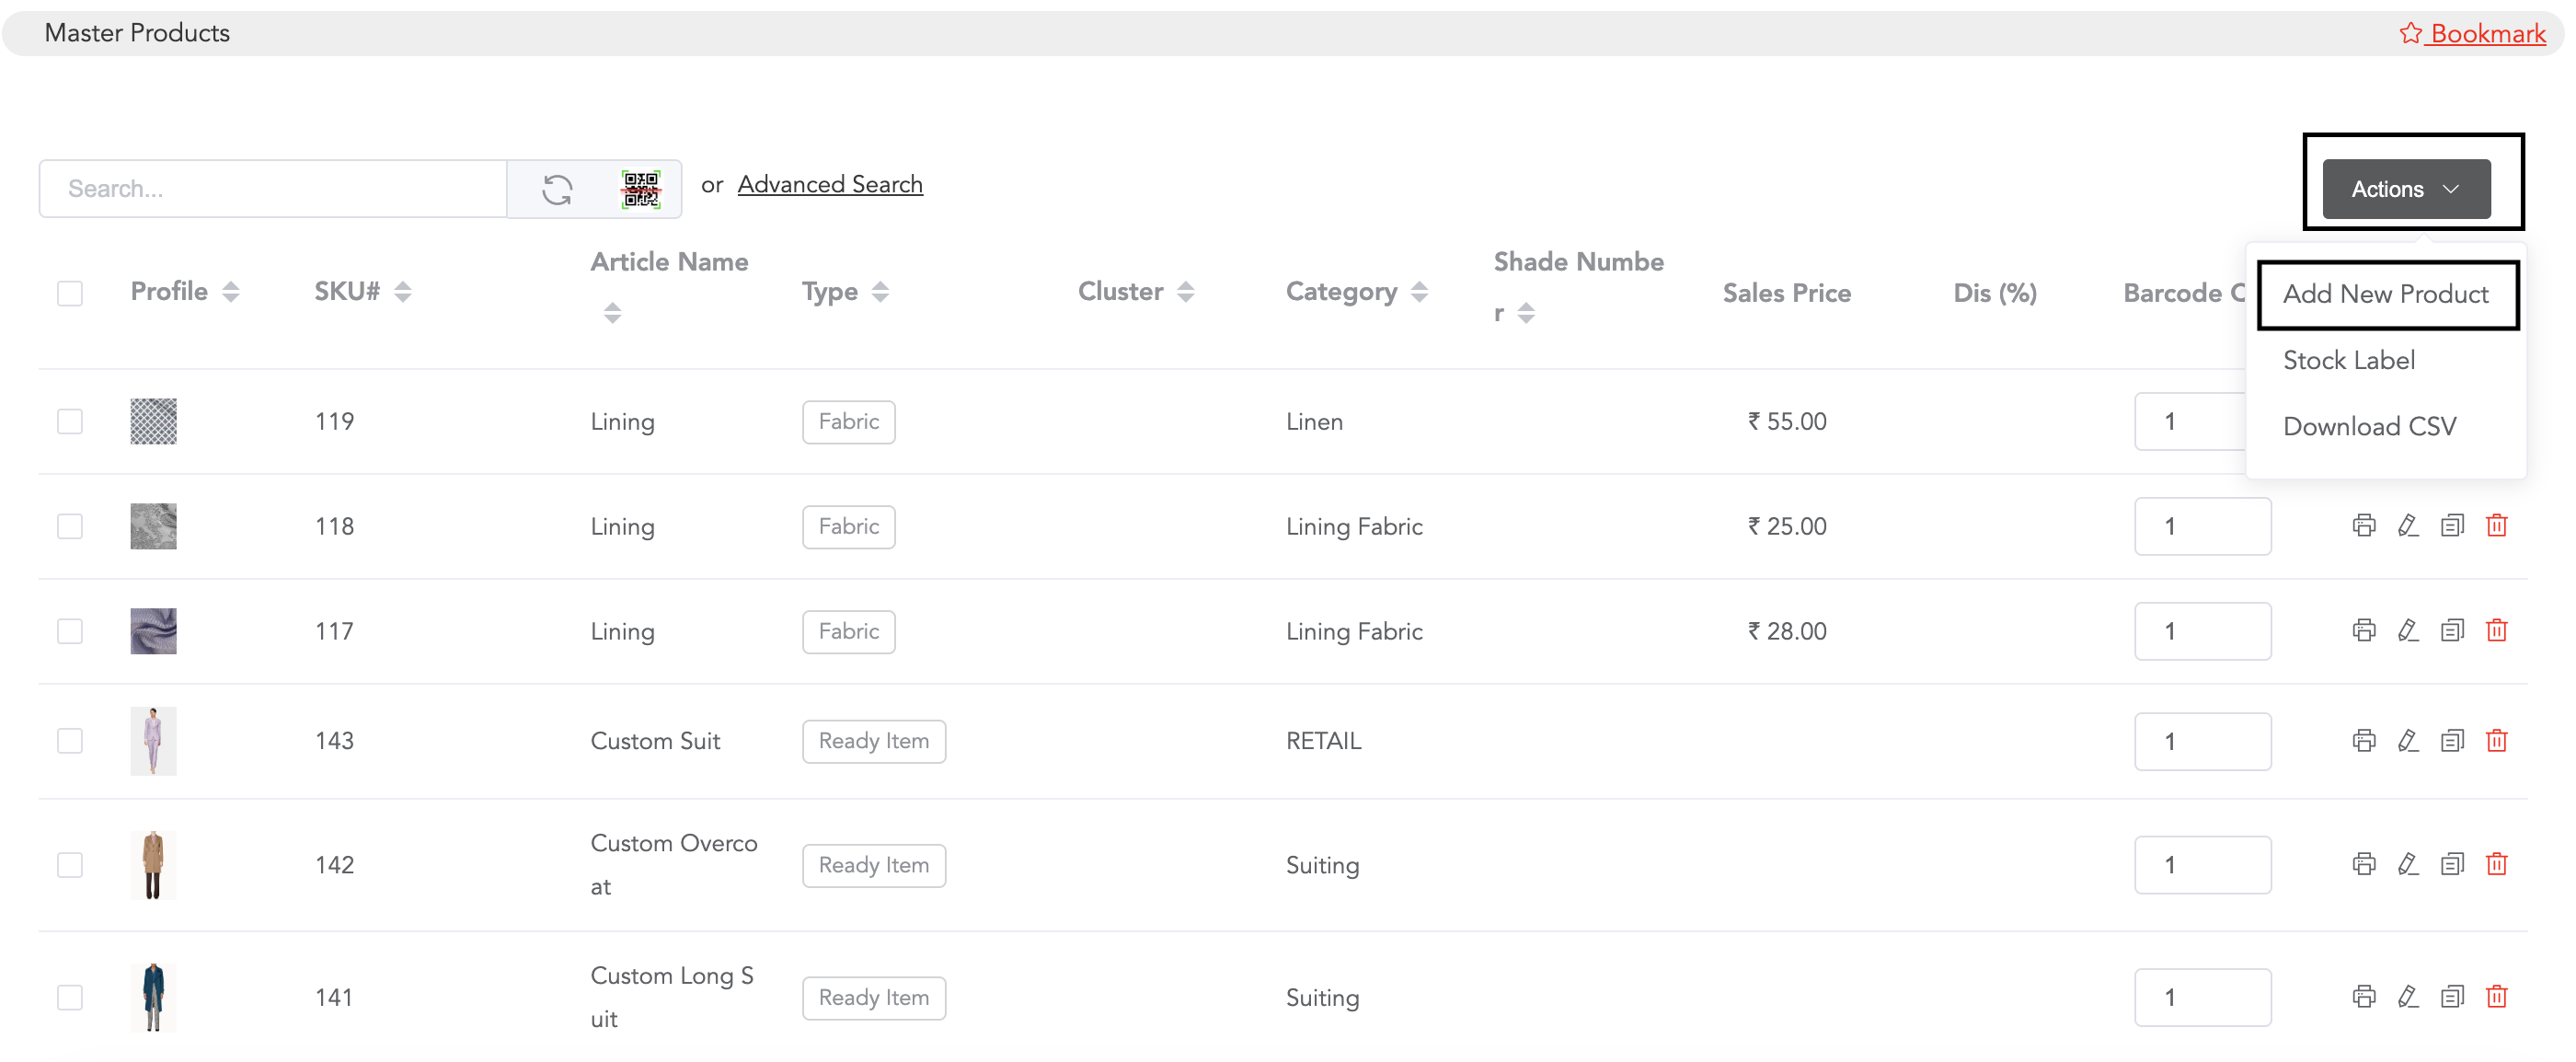
Go to ‘Actions’ and click on the option ‘Add New Product.‘ Then you can select the item type, whether it is a Ready Item or a Fabric
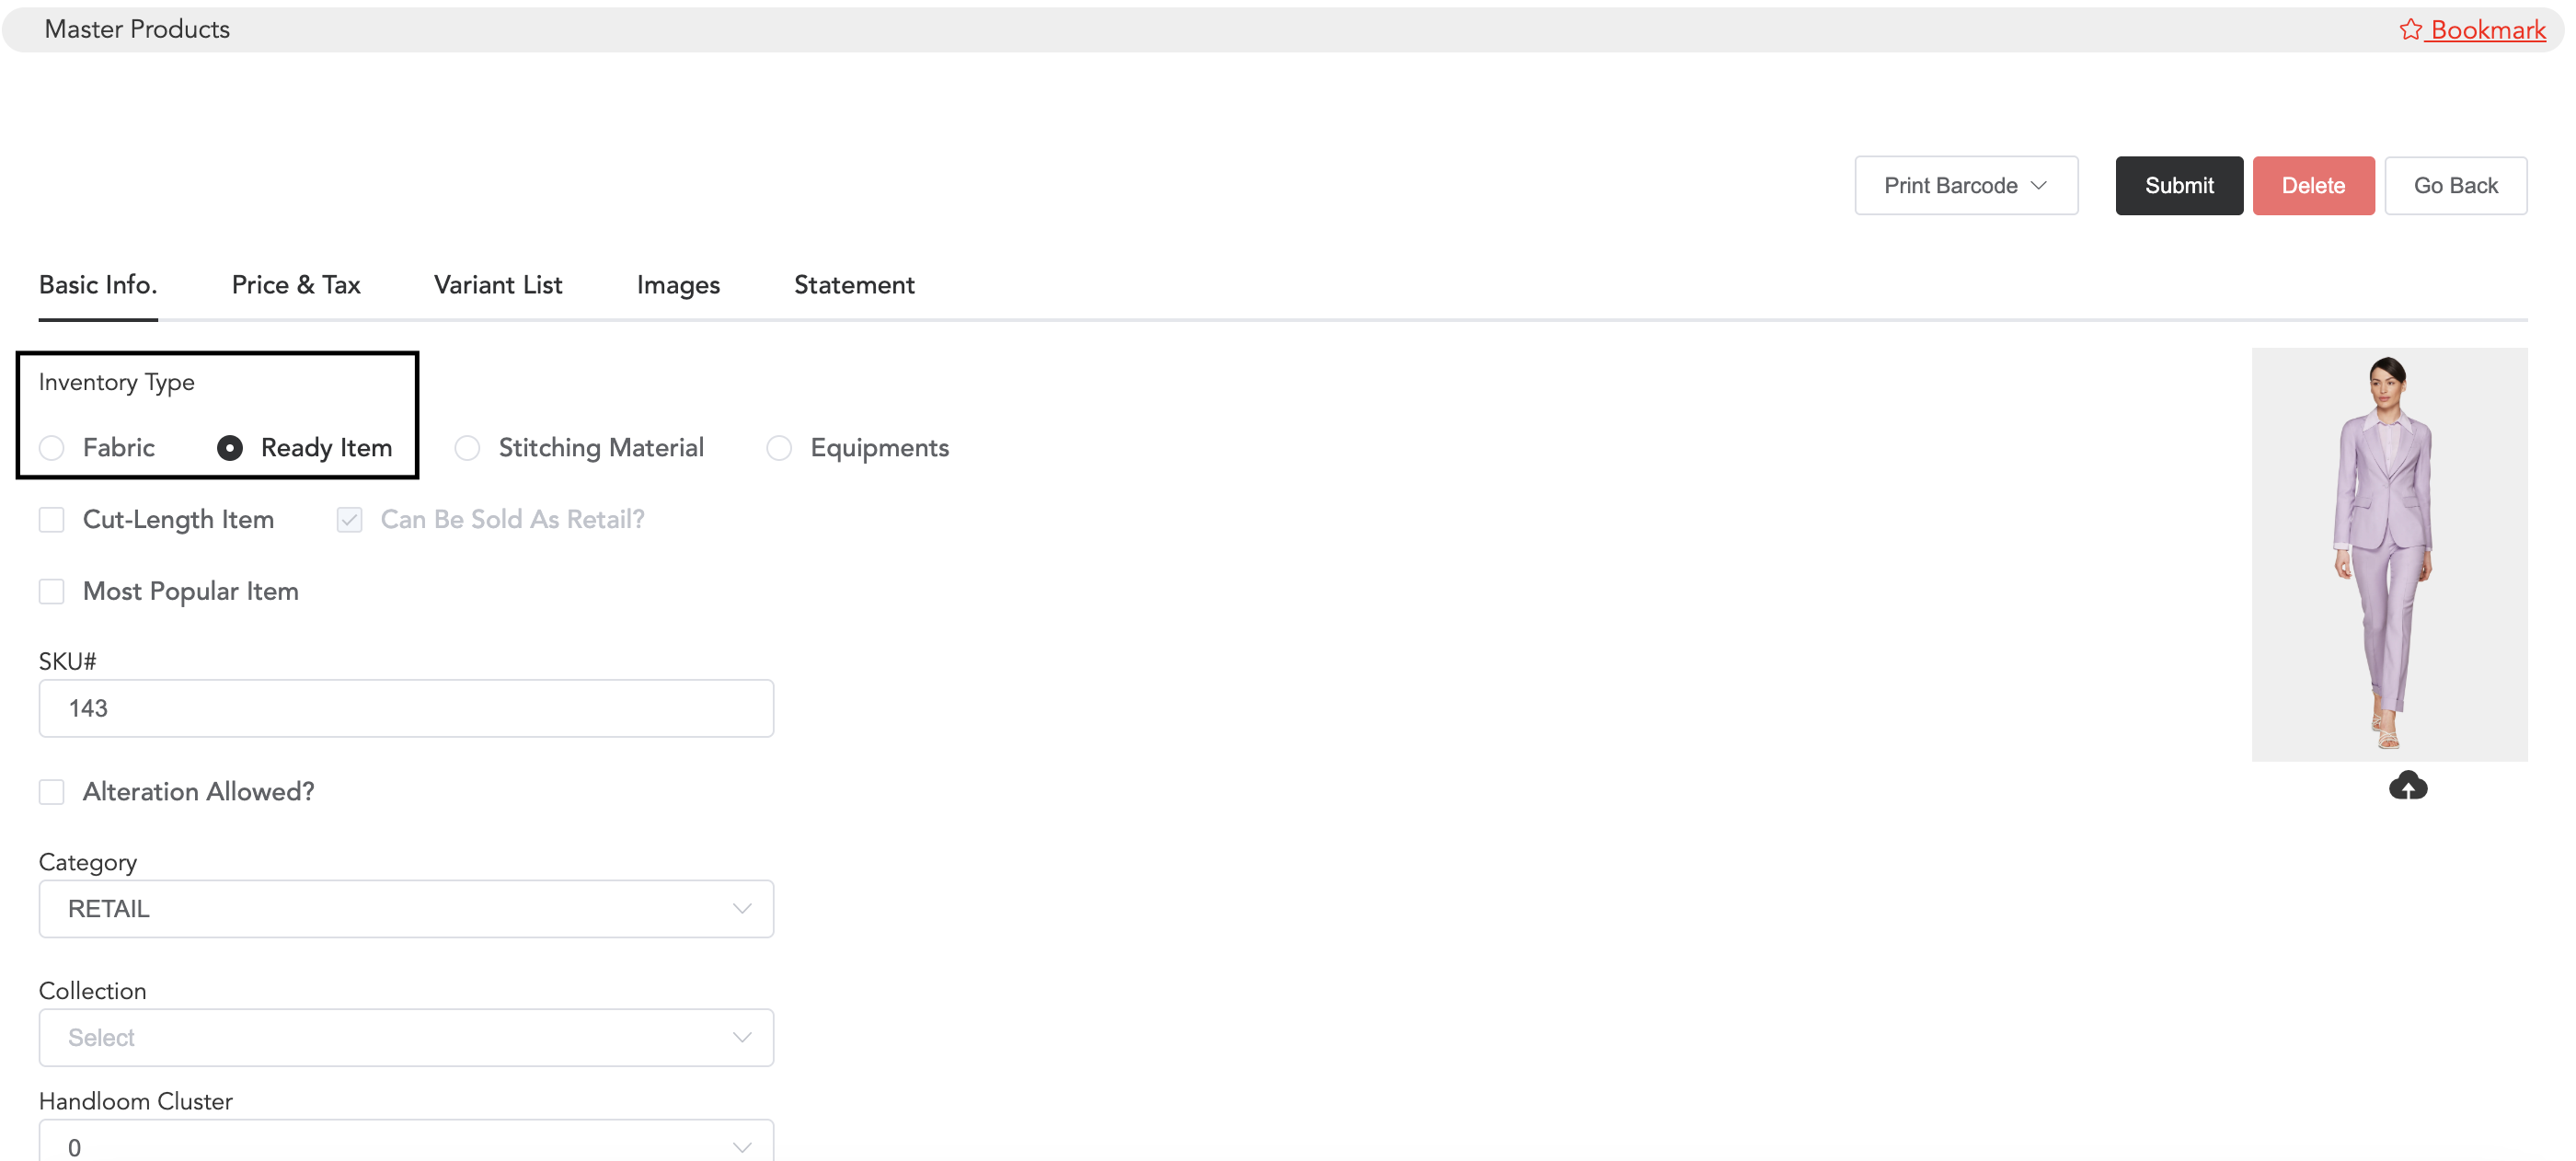
Select the ‘Inventory Type,‘ add all the other required details, and in the ‘Images’ section, you can upload multiple images of the item from different angles.
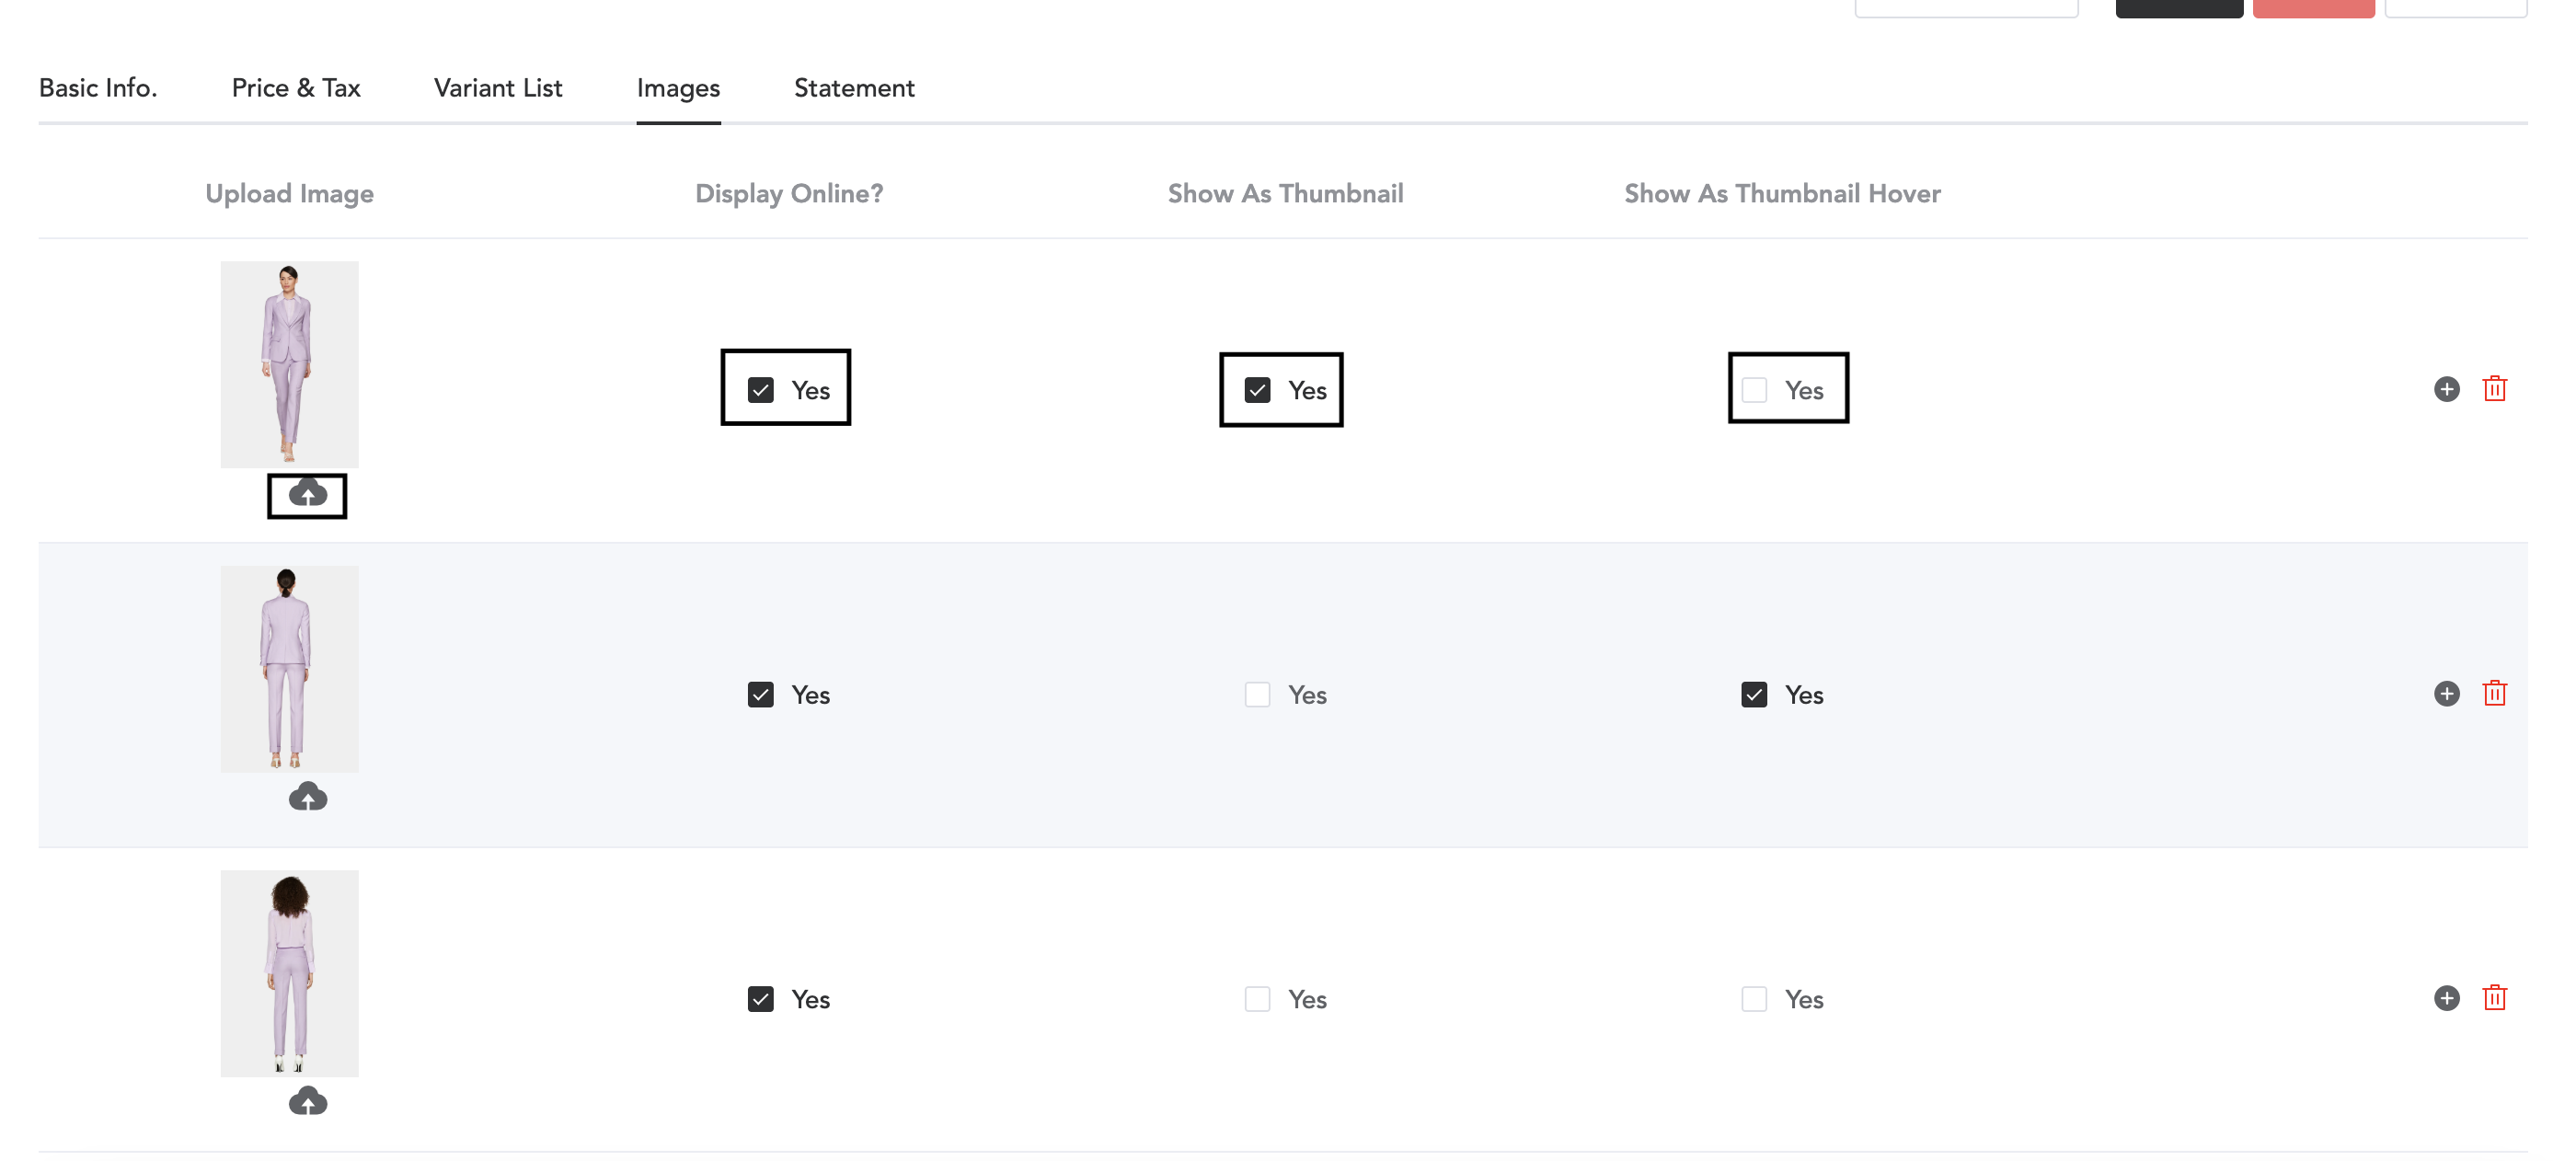
Click on the cloud icon to upload images and enable the option to display them online. You may make any image the thumbnail, and the hover effect can be applied.
The garment backend customization is done now. Next, in the E-Store Module of the software, you will need to make all the custom and ready garments available online. Then all the items will be displayed on the website.